Utilisation du piolet
Le piolet sert, à tailler les marches, comme moyen de sondage pour déceler les crevasses cachées, comme moyen d’assurage, mais d’abord et surtout comme point d’appui pendant la progression, l’escalade glacière, pour arrêter une glissade, et… pour le fun des descentes en ramasse (ou glissades sur les semelles).
Tenue du piolet
Une des premières questions que se pose le débutant est: comment tenir mon piolet
La réponse de Yvon Chouinard, glaciairiste éminent, est la suivante:
« Tenez toujours le piolet la pointe en avant, loin du corps, … la paume de la main prend appui sur la panne, le pouce repose sur l’œilleton, et l’index est allongé le long de la pointe. Lorsque le piolet est tenu correctement, la pointe s’aligne directement sur le bras tendu. »
A la descente, certains guides préconisent de tenir le piolet pointe en arrière. La raison invoquée est, que lors d’une chute vers l’arrière, la pointe du piolet vient naturellement se planter dans la neige, avec le double avantage de diminuer les risques de blessure et d’avoir le piolet en bonne position pour freiner la glissade.
Malheureusement l’inverse est vrai lors d’une chute vers l’avant.
On peut cependant affirmer que les chutes sur les fesses ou le dos sont beaucoup plus fréquentes, surtout chez le débutant qui a tendance à ne pas se pencher suffisamment en avant lors de la descente.
Piolet – 3ème point d’appui !
Bien utilisé, le piolet est un remarquable outil de progression et de sécurité. On distingue six façons principales d’utiliser le piolet.
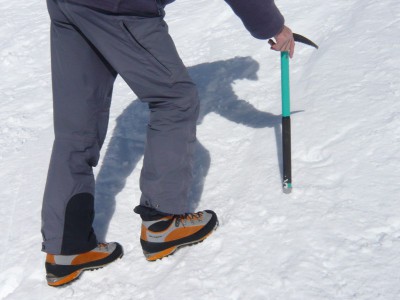
Piolet-canne (montée)
Le grimpeur tient le piolet de façon à prendre appui sur lui, c’est l’utilisation la plus courante du piolet.
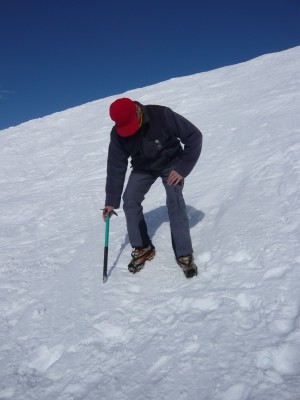
Piolet-canne (descente)
A la descente, le piolet est tenu de façon à ce que le pic soit dirigé vers l’arrière.
Dans un article qui m’a paru intéressant, Yves Saliba décrit la façon de tenir le piolet lorsqu’il est utilisé comme canne.
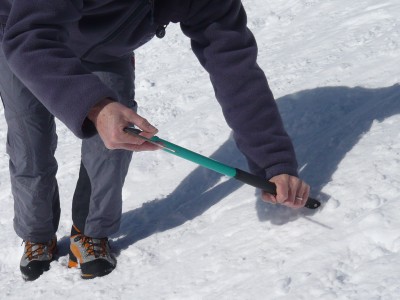
Piolet-ramasse
Le piolet est tenu à deux mains, à peu près horizontalement devant soi, la pointe plantée dans la neige, le pic dirigée vers l’avant. La main la plus éloignée de la pente coiffe la tête du piolet, paume reposant sur la panne. Cette main exerce une traction vers le haut. L’autre main saisit le manche du piolet à proximité de la pointe tout en exerçant un appui.
La technique du piolet-ramasse est fréquemment utilisée à la montée ou à la descente en biais, et lors de la traversée de pentes raides.
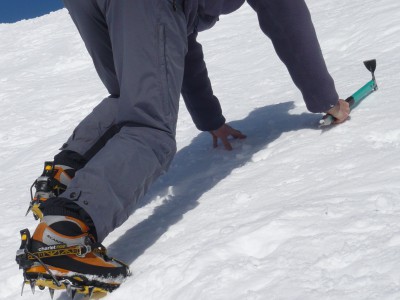
Piolet-ancre
Le piolet peut être planté au-dessus de soi, à bout de bras; l’ancrage se fait alors en tenant le manche d’une seule main près de la douille. Pour s’élever, on exerce une traction sur le manche du piolet – technique dite du « piolet-traction ». Le piolet peut également être planté à deux mains, au niveau des hanches , est être utilisé en appui. Le piolet-ancre est utilisé sur les pentes fortes et très fortes, à la montée, en traversée et à la descente.
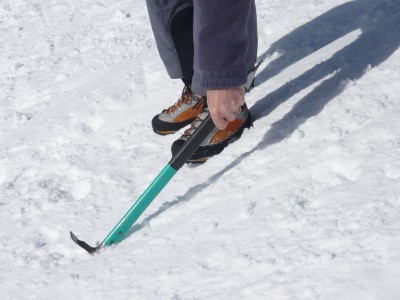
Piolet-rampe (utilisé à la descente)
Le montagnard face au vide, plante le pic du piolet au niveau des pieds. Le piolet est tenu d’une seule main.
Pendant que le montagnard descend, la main coulisse le long du manche en exerçant une force vers le haut, arrivée aux frettes elle retire le piolet.
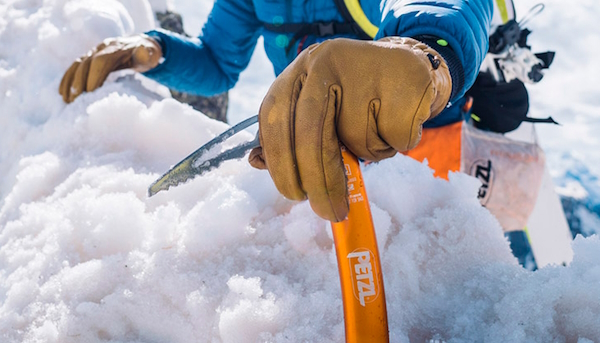
Photo Petzl
Piolet-appui
le piolet est tenu d’une seule main par la panne ou le manche. Si la main repose sur la panne – technique du « piolet-panne » – le piolet prend appui sur la pente par la pointe et le pic en même temps. Cette technique peut être utilisée à la montée, et à la descente face à la pente.
Au lieu de prendre appui sur la panne, la main peu aussi prendre appui sur le manche. Si la main tient le manche par son extrémité, seule le pic mord dans la neige – technique utilisée en descente face à la pente (similaire au piolet-rampe) .

Piolet-manche
le piolet, généralement tenu à deux mains pour plus de force, est planté verticalement devant soi, le plus profondément possible dans la neige. La traction doit s’exercer près de la neige. Cette technique est utilisée dans les pentes fortes et très fortes et les passages de rimayes, en neige dure mais surtout profonde.
Taille des marches
L’usage des crampons a relégué la fastidieuse corvée de la taille des marches aux oubliettes. Il arrive cependant que l’on se trouve parfois sans crampons sur une neige trop dure ou sur de la glace, ou bien que l’on se heurte à un passage raide dans une course facile. On utilise alors le piolet pour tailler les quelques marches qui permettront de poursuivre en toute sécurité.
Avant de commencer à tailler, bien observer le terrain afin de déterminer ses points faibles et forcer le passage avec le minimum de marches. Assurer son équilibre pour pouvoir tailler avec précision et un nombre minimal de coups de piolet.
On taille en utilisant le pic et la panne du piolet. Celui-ci est tenu de préférence à deux mains près de la douille.
Si la pente est raide, on taille d’une main (la main aval), l’autre main étant appuyée contre la pente ou se tenant à une prise préalablement taillée dans la glace.
Sur pente très raide, il est parfois agréable d’appuyer la jambe et le genou amont contre la pente pour maintenir l’équilibre.
Il faut savoir que la précision des coups est plus importante que la force. Il faut s’exercer à tailler aussi bien de la main droite que de la main gauche. A la descente, les marches seront plus proches les unes des autres qu’à la montée.
En neige très dure on aura souvent avantage à tailler des encoches pour la semelle « dans la foulée », c’est à dire au rythme de la marche. L’avantage de cette méthode est double: rapidité et moindre effort.
Le piolet est tenu d’une seule main; on fait décrire à la tête du piolet un mouvement de pendule de sorte que la panne vienne attaquer la neige presque tangentiellement, un coup de piolet suffit pour tailler une encoche. En synchronisant le mouvement du bras avec celui de la marche, on peut ainsi tailler une petite marche juste devant le pied qui va s’y placer.
Piolet-frein …ou comment arrêter une glissade
Les techniques décrites ici sont celles qui permettent au montagnard d’arrêter lui-même une glissade involontaire, sans intervention de la corde (ou freiner une glissade pour réduire le choc sur la corde). Il y a quatre principes à observer:
- éviter les gestes désordonnés, rester calme et lucide,
- agir vite pour ne pas prendre trop de vitesse,
- avant tout essai de freinage, placer et maintenir le corps dans une position normale: tête vers le haut et pieds vers le bas,
- avec les crampons, maintenir les pieds soulevés pour qu’ils n’accrochent pas la neige.
En neige molle
Commencer par maintenir le piolet bien dégagé du corps, en le tenant par le manche puis se placer sur le dos et se redresser brusquement en prenant appui sur les talons; courir dans la pente en ralentissant progressivement.
En neige dure
Le freinage se fait avec le piolet. Positionner rapidement le corps de telle sorte que la tête soit côté amont et les pieds côté aval. Une fois en bonne position, se placer sur le côté et planter le pic du piolet dans la neige à hauteur de l’épaule. Se freiner progressivement à l’aide du pic, une main toujours sur le manche, l’autre exerçant une pression sur la tête du piolet (voir la vidéo).
Sur glace ou neige très dure
La glissade est presque impossible à enrayer. Il faut néanmoins s’efforcer de freiner la glissade au maximum pour que le choc sur la corde soit le moins violent possible.
Arrêter une glissade sur la neige n’est pas chose aisée, surtout lorsque le poids du sac entraîne le corps tête vers le bas. La rapidité d’exécution nécessite des réflexes qui ne peuvent s’acquérir que par la pratique. Pour cela, choisir une pente suffisamment raide mais pas trop longue, se terminant par un replat, et s’exercer à stopper les glissades provoquées par différents types de chutes.
Le piolet m’accompagne partout.
Il fait souvent sourire les « alpinistes » en shorts et baskets.
Qu’importe, il m’a souvent rendu service; même sur des pentes de terre ou en herbe.
Using the ice axe
The ice axe is used to carve steps, as a probe to find hidden crevasses, as a belay device, but first and foremost as a foothold during progression, ice climbing, to stop a slide and… for the fun of ramasse descents (or sliding on the soles).
Holding the ice axe
One of the first questions beginners ask themselves is: how do I hold my ice axe?
The answer from Yvon Chouinard, a leading glaciologist, is as follows:
« Always hold the ice axe with the point forward, away from the body, … the palm of the hand rests on the purlin, the thumb rests on the eyecup, and the index finger is extended along the point. When the ice axe is held correctly, the point aligns directly with the outstretched arm. »
When descending, some guides recommend holding the ice axe pointing backwards. The reason given is that when you fall backwards, the tip of the ice axe naturally digs into the snow, with the dual advantage of reducing the risk of injury and keeping the ice axe in the right position to slow the slide.
Unfortunately, the opposite is true of a forward fall.
However, falls onto the buttocks or back are much more common, especially for beginners who tend not to lean forward enough when descending.
Ice axe – 3rd support point!
Used properly, the ice axe is a remarkable tool for progress and safety. There are six main ways to use an ice axe.

Piolet-canne (uphill)
The climber holds the ice axe so as to lean on it. This is the most common use of the ice axe.

Piolet-canne (downhill)
On descent, the ice axe is held so that the pick is pointing backwards.
In an article I found interesting, Yves Saliba describes how to hold an ice axe when using it as a walking stick.

Pick and shovel technique
The ice axe is held in both hands, more or less horizontally in front of you, with the tip planted in the snow and the pick pointing forwards. The hand furthest from the slope covers the head of the ice axe, palm resting on the purlin. This hand pulls upwards. The other hand grips the shaft of the ice axe close to the tip while providing support.
The pick and shovel technique is frequently used when ascending or descending at an angle, and when traversing steep slopes.

Pick-anchor
The ice axe can be held above you at arm’s length, anchored by holding the shaft close to the socket with one hand. To ascend, you pull on the shaft of the axe – a technique known as « piolet-traction ». The ice axe can also be held with both hands, at hip level, and used for support. The axe-anchor is used on steep and very steep slopes, for ascents, traverses and descents.

Ice pick (used on descent)
Le montagnard face au vide, plante le pic du piolet au niveau des pieds. Le piolet est tenu d’une seule main.
Pendant que le montagnard descend, la main coulisse le long du manche en exerçant une force vers le haut, arrivée aux frettes elle retire le piolet.

Photo Petzl
Pole-support
the ice axe is held in one hand by the pick or shaft. If the hand is resting on the purlin – the « pick-pin » technique – the ice axe is supported on the slope by the point and the pick at the same time. This technique can be used both when ascending and descending facing the slope.
Instead of resting on the purlin, the hand can also rest on the shaft. If the hand holds the end of the shaft, only the pick bites into the snow – a technique used on downhill slopes (similar to the pick-ramp).

Pick and handle
the ice axe, generally held with both hands for greater strength, is planted vertically in front of you, as deep as possible in the snow. The pull must be close to the snow. This technique is used on steep and very steep slopes and rimayes, in hard but especially deep snow.
Size of steps
The use of crampons has consigned the tedious chore of trimming steps to oblivion. Sometimes, however, you find yourself without crampons on snow that’s too hard or on ice, or you come up against a steep passage on an easy run. In these cases, you use your ice axe to carve out the few steps that will allow you to continue safely.
Before you start carving, take a good look at the terrain to determine its weak points and force your way through with the minimum number of steps. Keep your balance so that you can carve with precision and a minimum number of ice axe strokes.
You carve using the pick and the bit of the ice axe. It is best to hold the pick close to the socket with both hands.
If the slope is steep, you cut with one hand (the downstream hand), the other hand resting against the slope or holding on to a grip previously cut into the ice.
On very steep slopes, it’s sometimes a good idea to lean your leg and knee up against the slope to maintain your balance.
It’s important to remember that precision of stroke is more important than strength. You need to practise using both your right and left hands. On the way down, the steps will be closer together than on the way up.
In very hard snow, it is often best to cut notches for the sole ‘in stride’, i.e. at the same pace as you walk. The advantage of this method is twofold: speed and less effort.
The ice axe is held in one hand; the head of the ice axe is made to describe a pendulum movement so that the bit attacks the snow almost tangentially, one stroke of the ice axe is enough to cut a notch. By synchronising the movement of the arm with that of the step, you can cut a small step just in front of the foot that will be placed in it.
Piolet-frein …or how to stop a slide
The techniques described here are those which allow the climber to stop an involuntary slide himself, without the intervention of the rope (or to slow down a slide to reduce the impact on the rope). There are four principles to observe:
♦ avoid uncoordinated movements, stay calm and clear-headed,
♦ act quickly to avoid gaining too much speed,
♦ before any braking attempt, place and maintain your body in a normal position: head up and feet down,
♦ when using crampons, keep your feet raised so that they don’t catch on the snow.
In soft snow
Start by keeping the ice axe well clear of the body, holding it by the shaft, then place yourself on your back and stand up abruptly, supported by your heels; run up the slope, gradually slowing down.
In hard snow
Braking is done with the ice axe. Quickly position your body so that your head is on the uphill side and your feet are on the downhill side. Once in the correct position, stand on your side and plant the pick of the ice axe in the snow at shoulder height. Gradually slow down using the pick, one hand still on the shaft, the other exerting pressure on the head of the ice axe (see video).
On ice or very hard snow
The slide is almost impossible to stop. Nevertheless, you should try to slow the slide as much as possible so that the impact on the rope is as gentle as possible.


This really answered my downside, thanks!
Have you ever thought about adding a little bit more than just your articles? I mean, what you say is valuable and all. Nevertheless imagine if you added some great pictures or videos to give your posts more, « pop »! Your content is excellent but with pics and videos, this website could certainly be one of the best in its field. Fantastic blog!
I just could not depart your site before suggesting that I really enjoyed the standard info a person provide for your visitors? Is gonna be back often in order to check up on new posts
Your insights on talent management and succession planning are incredibly useful.
Useful information. Fortunate me I found your site by accident, and I am shocked why this accident didn’t came about in advance! I bookmarked it.
I?m impressed, I must say. Actually not often do I encounter a weblog that?s both educative and entertaining, and let me let you know, you have got hit the nail on the head. Your idea is outstanding; the difficulty is something that not enough persons are speaking intelligently about. I am very glad that I stumbled across this in my seek for something relating to this.
It?s onerous to search out knowledgeable folks on this subject, however you sound like you realize what you?re speaking about! Thanks
I am extremely impressed with your writing skills as well as with the layout on your weblog. Is this a paid theme or did you customize it yourself? Anyway keep up the nice quality writing, it is rare to see a great blog like this one these days..
Hey very nice website!! Man .. Excellent .. Amazing .. I’ll bookmark your web site and take the feeds also?I’m happy to find a lot of useful info here in the post, we need work out more strategies in this regard, thanks for sharing. . . . . .
okmark your blog and check again here regularly. I am quite certain I will learn lots of new stuff right here! Good luck for the next!
This is my first time visit at here and i am
actually pleassant to read all at one place.
Hi, I do think this is a great site. I stumbledupon it 😉 I may come back yet again since I
saved as a favorite it. Money and freedom is the greatest way to change, may you be
rich and continue to guide other people.
I think the admin of this web page is really working hard for his web page, since here every data is quality based data.
Je n ai pas vus le temps passer, merci beaucoup pour ce plaisir passe sur votre page.