


Progression sur neige avec le piolet / Progressing on snow with an ice axe
Snow walking with an ice axe

Utilisation du piolet dans la neige / Using an ice axe in snow
Using an ice axe on snow

Test des corps-morts / Deadweight test
test des corps-morts
Le laboratoire de l’ENSA Chamonix a étudié la résistance de différents corps-morts
utilisés en alpinisme et par les secouristes :
pieux, ancres à neige, piolets, skis, bâtons, champignons etc.
plus – ancrage en neige
deadweight testing
The ENSA Chamonix laboratory has studied the resistance of various bracing systems
used in mountaineering and by rescue workers:
piles, snow anchors, ice axes, skis, poles, mushrooms, etc.
more – snow anchoring

Assurages sur neige et glace / Snow and ice belaying
Contrairement au rocher,
il n’existe pratiquement pas de points d’assurages naturels
sur neige et glace
Points d’assurages sur neige
La neige n’étant pas un matériau très consistant, un piolet enfoncé verticalement dans une telle substance, plus ou moins molle, ne peut en aucun cas retenir directement un choc.
L’utilisation d’un corps-mort enfoui dans la neige procure un encrage beaucoup plus sûr. Cela peut être un piolet, un sac à dos, une bûche, un sac rempli de neige, etc… Un autre moyen consiste à élaborer un champignon de neige.
—–Installation d’un piolet comme corps-mort—–
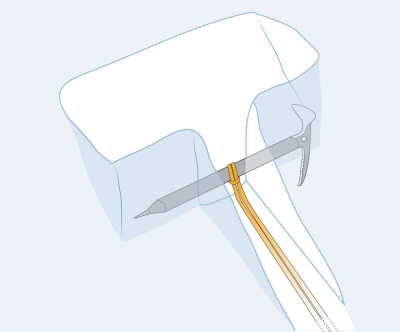
Creuser une tranchée horizontale de la taille du piolet ainsi qu’une tranchée plus étroite et moins profonde perpendiculaire à la première afin que l’ensemble forme un « T ». Fixer un anneau de sangle ou une cordelette (noeud de cabestan) au milieu du manche et placer le piolet horizontalement dans la tranchée du haut la sangle passant dans la jambe du « T ». Recouvrir le tout de neige et bien tasser. Ce système est toujours plus résistant qu’un piolet enfoncé verticalement. Se placer en aval du relais.
Extrait du Syndicat National des Guides de Montagne.
Voir aussi Montagne Magazine
—–Champignon de neige—–
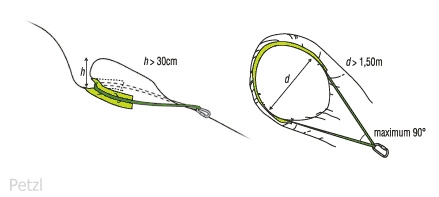
Confectionner un champignon de neige prend du temps car il doit être fait avec soin.
Bien tasser la neige. Creuser une tranchée circulaire qui sera plus profonde côté amont. Placer une protection puis la sangle ou la cordelette. Moins la neige est consistante plus grand sera le champignon (mais au minimum 150 cm de diamètre et 30 cm de hauteur). Lors d’un rappel, une grande longueur de cordelette ou de sangle sera abandonnée.
Extrait du Syndicat National des Guides de Montagne.
Pour assurer un premier de cordée en neige il convient de faire un assurage plus dynamique qu’en rocher ou glace.
Le demi-cabestan est peu recommandé car il n’est pas assez dynamique en pareil circonstance.
Il est préférable, par exemple, d’utiliser le 8 « huit »; et prévoir une plus grande réserve de corde de freinage.
Points d’assurages sur glace
—–Relais sur broche à glace—–
Placer une broche à glace n’est pas compliqué. Dégager la surface de l’éventuelle couche de neige ou de glace de mauvaise qualité et enfoncer la broche en la vissant. Pour faciliter l’amorçage il suffit de pratiquer une encoche avec la pointe du piolet, délicatement. Plus la broche est longue, meilleure est sa tenue.
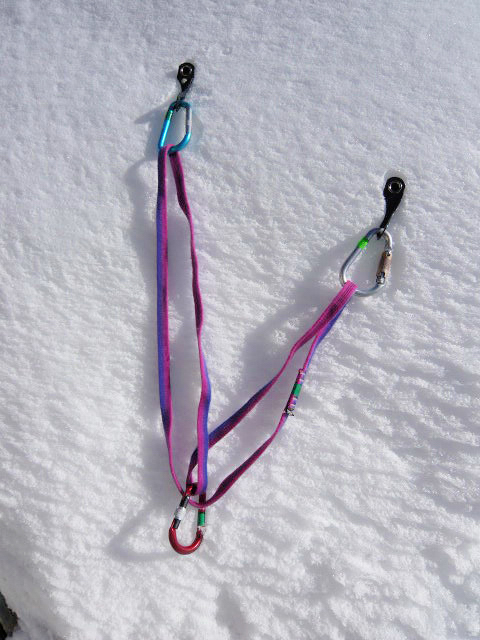
Un relais est constitué de deux broches, distantes de 20 à 30 cm et décalées dans le plan vertical pour éviter que toutes les deux ne se trouvent malencontreusement dans une même fissure horizontale invisible à l’oeil.
Une fois installées les broches seront recouvertes de neige ou de glace pour éviter que la chaleur extérieure ne se propage le long du métal et ne vienne fragiliser le couple broche-glace. Utiliser une grande sangle (à défaut une cordelette de 8 m/m) pour relier les broches entre elles.
Pour ce faire, fixer un mousqueton dans chaque broche et passer la sangle (cordelette) dans les mousquetons. Dans le cas d’une sangle non cousue (ou d’une cordelette) passer celle-ci directement dans l’oeillet des broches et nouer la sangle avec un noeud de sangle (noeud de pêcheur double pour une cordelette).
Il est important que la sangle (cordelette) puisse coulisser librement au niveau des broches. Si tel est le cas, la force de traction sera également répartie entre chaque point d’amarrage quelle que soit la direction de la traction. Placer un mousqueton à vis sur les deux brins de la sangle (cordelette) de telle sorte que celle-ci prenne la forme d’un « V ».
ATTENTION cependant. Si l’une des broches vient à lâcher, le mousqueton
va glisser le long de la sangle (cordelette) et de la broche libre est s’en est fini de l’assurage.
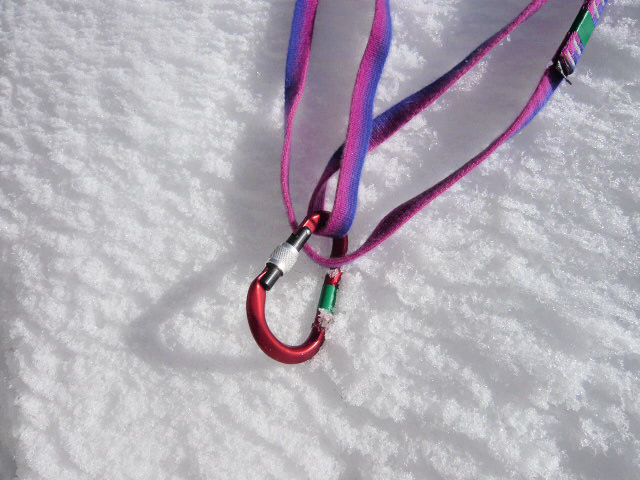
⇒ Pour éviter que le mousqueton ne s’en aille, et vous avec, il faut impérativement faire une boucle sur l’une des deux parties de la sangle (cordelette), simplement en croisant le brin.
On peut également faire un noeud avec les deux brins de la sangle (cordelette). Le mousqueton sera placé dans la petite boucle. Ce système est encore plus sûr, mais on ne bénéficie plus de la répartition automatique de la force de traction !
Une séquence vidéo de TVMountain, en partenariat avec Millet, explique toute la procédure en images.
—–Lunule—–
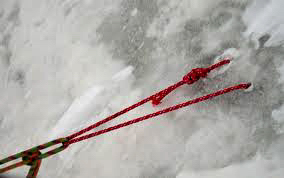
Ce système permet de confectionner un ancrage en creusant un petit tunnel dans la glace à l’aide d’une broche. On y passe une cordelette de 7 – 8 mm de diamètre que l’on noue avec un double noeud de pêcheur. Lors d’un rappel, par exemple, seule la cordelette sera abandonnée.
Pour ce faire, il est nécessaire d’avoir une broche à glace, et un crochet spécial en vente dans le commerce.
Extrait du site Forum Mont-Blanc, Chamonix (photo de Jérôme).
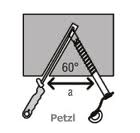
Faire un premier trou à l’aide de la broche, faisant un angle d’environ 60 degrés avec la surface. Placer le crochet dans le trou pour visualiser l’angle que doit faire le deuxième trou, symétrique, qui doit rejoindre le premier.
Image Petzl.
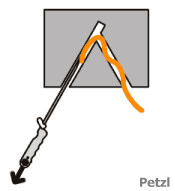
Faire passer la cordelette dans l’un des trous en la tordant sur elle-même et à l’aide du crochet tirer sur celle-ci pour la faire ressortir par l’autre trou. Nouer les deux bouts à l’aide d’un noeud de pêcheur.
Si « a » fait 10 cm la lunule peut résister à environ 6 kN soit 610 kg en bonne glace.
Image Petzl.
Unlike rock,
there are practically no natural belay points
on snow and ice
Belay points on snow
As snow is not a very consistent material, an ice axe buried vertically in such a substance, which is more or less soft, cannot withstand a direct impact.
Using a dead body buried in the snow provides a much safer hold. This could be an ice axe, a rucksack, a log, a bag filled with snow, etc. Another way is to make a snow mushroom.
—–Installing an ice axe as an anchor bolt—–

Dig a horizontal trench the size of the ice axe and a narrower, shallower trench perpendicular to the first so that the whole forms a « T ». Attach a ring of webbing or a cord (capstan knot) to the middle of the shaft and place the ice axe horizontally in the upper trench, with the webbing passing through the leg of the « T ». Cover the whole thing with snow and pack well. This system is always more resistant than a vertical axe. Position yourself downstream of the belay.
Extract from the Syndicat National des Guides de Montagne.
See also Montagne Magazine
—–Snow mushroom—–

Making a snow mushroom takes time because it has to be done with care.
Pack the snow well. Dig a circular trench that will be deeper on the upstream side. Place a protective layer and then the strap or cord. The smaller the snow, the bigger the mushroom (but at least 150 cm in diameter and 30 cm high). When abseiling, a long length of cord or webbing should be left behind.
Extract from the Syndicat National des Guides de Montagne.
To belay a leader in snow, you need a more dynamic belay than in rock or ice.
The half-cabestan is not recommended because it is not dynamic enough in such circumstances.
It is preferable, for example, to use the 8 « huit » and to have a larger reserve of braking rope.
Belay points on ice
—–Belay on ice spit—–
Installing an ice spit is not complicated. Clear the surface of any layer of poor quality snow or ice and screw in the pin. To make priming easier, simply make a notch with the tip of your ice axe. The longer the pin, the better it holds.

A relay is made up of two pins, 20 to 30 cm apart and vertically offset so that they do not both end up in the same horizontal crack, invisible to the eye.
Once installed, the pins should be covered with snow or ice to prevent the outside heat from spreading along the metal and weakening the pin-ice pair. Use a large strap (or an 8 m/m cord) to link the pins together.
To do this, attach a snap hook to each pin and pass the webbing (cord) through the snap hooks. If you are using unstitched webbing (or cord), pass it directly through the eyelet of the pins and tie the webbing with a webbing knot (double fisherman’s knot for cord).
It is important that the webbing (cord) can slide freely over the pins. If this is the case, the pulling force will be evenly distributed between each mooring point, regardless of the direction of the pull. Place a screw carabiner on both strands of the webbing (rope) so that it forms a « V » shape.
BE CAREFUL, however. If one of the pins comes loose, the karabiner
will slide along the webbing (cord) and the free pin and the belay will be over.

⇒ To prevent the carabiner from coming off, and you along with it, it’s essential to make a loop on one of the two parts of the webbing (cord), simply by crossing the strand.
You can also tie a knot with the two strands of webbing (cord). The snap hook will be placed in the small loop. This system is even safer, but you no longer benefit from the automatic distribution of traction force!
A video sequence from TVMountain, in partnership with Millet, explains the whole procedure in pictures.
—–Lunula—–

This system allows you to make an anchor by digging a small tunnel in the ice using a pin. A 7-8 mm diameter cord is passed through the tunnel and tied with a double fisherman’s knot. When abseiling, for example, only the cord will be left behind.
To do this, you’ll need an ice screw and a special hook available in shops.
Extract from the Forum Mont-Blanc website, Chamonix (photo by Jérôme).

Use the spindle to make the first hole at an angle of approximately 60 degrees to the surface. Place the hook in the hole to see the angle at which the second, symmetrical hole should meet the first.
Image Petzl.

Twist the cord through one of the holes and use the hook to pull it through the other hole. Tie the two ends with a fisherman’s knot.
If « a » is 10 cm long, the lunula can withstand about 6 kN (610 kg) in good ice.
Image Petzl

